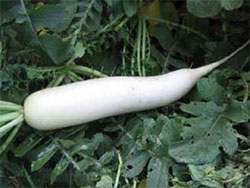
RADISH
Almost every part of the radish plant is useful. The leaves and roots may be eaten raw or cooked as vegetable, or cooked with meat or fish. Besides its use as food, radish is also used in many other ways its oil does not dry up like ordinary oil. This is used in soap making the meat after juice extraction is used as fertilizer. Radish is also medicine for diseases of the liver and spleen. There are two kinds of radish. One is planted for its crop and the other for its leaves and roots. The different varieties we have are:
- Japanese radish -- big and long, late harvested
- Chinese radish -- fine, smooth and white, productive and has moderate
length of time for harvest - White icicle -- early harvest, rounded, long with small roots.
- Bombay, 60 Days and others -- can harvest within 100 days from planting, and mature 30 days from germination.
Land Preparation
- Plow and harrow the field lengthwise and crosswise, and leave it for seven days to allow the uprooted weeds to rot and their seeds to grow.
- Plow and harrow as before, repeat a third time but deeper.
- Make elevated beds about one-half meter away from each other.
- Put fertilizer where plants will be grown mix this with the soil by means of a rake.
Planting
- A hectare of land would accommodate about 100 grams of seeds. Apply a kerosene can of compost before planting.
- Treat the seeds first in growth regulator like "Seet Treat."
- Mix one teaspoon Orthocide 50 WP per kilo of seeds to check whatever diseases they may have.
- Prepare the planting of the seeds. To make them evenly apart, use a string attached to both ends -- one at 10 cm, a second at 40 cm, etc.
- With the aid of a pointed stick, make a hole one and a half (1-½) cm deep and 10 cm apart, following the distance of the string.
- Drop two seeds in each hole and cover with fine soil. Water with fine spray so as not to dislodge the seeds or remove the top soil.
- Cover with straw about 5-10 cm thick between the rows of plants, with space of about 5 cm from the plant. Do not cover the seed especially if it has not germinated. Keep away chicken from scratching the seeds away. The straw or dried leaves serve to protect the plants from strong rain or intense heat, and from growing weeds.
- Water morning and afternoon in the first three (3) days after planting do not allow them to get dry. When the seeds germinate, water only in the morning. Ten days after all have germinated, water only in the afternoon when the ground is dry.
- Dig a canal around the plot about 30 cm wide and 40 cm deep to where the water will run in case of heavy rain.
Before planting, mix a can of compost to every 2 sq. meters of plot. If animal manure will be used, apply this after the first plowing: one can per sq. meter. If chemical fertilizer will be used, have the soil analyzed first at the Bureau of Soils Laboratory. If not, the National Food and Agricultural Council recommends 8 bags of ammonium sulfate for every hectare of radish plants.
Maintenance - When the soil around the plant becomes compact, loosen it especially when the roots are beginning to grow. Be careful not to hurt the roots. If in spite of putting straw or dried leaves, weeds continue to grow, remove them manually.
Pests - To control insect pests, spray any of the following: Orthene 75 SP, SD, Tamaron 600 EC, Phosdrin 1.5 Ec, Hostathion 40 EC, or Vegetox, following instructions on the label, at an interval of 7 days. Trapping by means of light helps to control insect pests.
Diseases - A soil-borne or seed borne disease of radish attacks the new plant when the soil is very wet. As mentioned earlier, treat the seeds with orthocide or Spergon Fermate or Zerlate -- one-half teaspoon per gallon water. The black rot disease has a V-shape on the leaves. The leaves turn yellow then fall off. There is a black ring around the body when the leaf is removed
Harvesting - Different varieties have different times of maturity, from 30 days from germination to 100 days after planting. Thus, it is good to know the variety to be planted, or try ten plants first. When overmature, radish is fibrous, porous and does not taste good. Pull up the crop when harvesting in early morning or late afternoon. Do not harvest when the sun is hot because it will wilt immediately. Wash, bundle and bring to market first hour in the morning. Do not pile them too high so as not bruise the crops, and to avoid heating for the crops under the pile.
Seeding - Get seeds only from healthy plants. Let these flower and bear seeds. Apply 2 grams ammonium sulfate, and water daily. Maintain with care until the fruits turn yellow. Select good seeds from good plants. When the pods are over mature, these will burst open. Dry the seeds in the sun to kill pests or disease. Before storing them, mix a little DDT or Orthocide 50 WP before packing. Put in a jar with fine charcoal at the bottom and over it a piece of cardboard with holes. Label jar. Seal the cover with masking tape until the next planting season.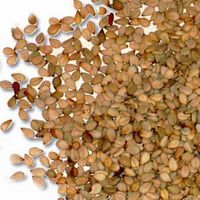
SESAME
(Tilseed, Cameline, German sesame, benniseed, dodder, linga) Sesame (linga) oil is used, not only for cooking food, but also for the manufacture of other things, such as margarine, soap, cosmetics, perfume, insecticides, pain and medicine. What is left after the extraction of its oil is excellent for feed for poultry, hogs, goat and rabbits. Its protein content is 22%, besides other substances.
There are many kinds of sesame. The following varieties yield good harvest and abundant oil: Sri Lanka Black, Japanese Black, and Iligan Marinduque Black, which are native to us. The white varieties that similarly yield good harvest and abundant oil which are used for special cuisine, are: the Japanese White, Guatemala White, Mexican White and our own native white variety. These are resistant to pests and diseases. Sesame grows in warm weather. This will not thrive in temperature as low as 21°C. It can withstand dry weather, but also needs watering as it grows. Because sesame seeds are very tiny, it seeds should be planted shallow in soil, free from weeds, does not retain water, and fertile.
The distance of the plants from one another should be one-half meter apart if the variety does not bear branches, and 70-80 cm apart if it bears branches. Mix the seeds with sand, and plant 5-10 seeds in a hole about 10-15 cm apart if it is branch-bearing, and only 8-12 cm if it is not branch bearing. In one hectare of land, 4-6 kilos of seeds can be accommodated. Irrigation is necessary in planting, but only once or twice after planting when it is growing. It needs watering before flowering and before fruit bearing.
The seeds germinate 5-7 days after sowing. Two weeks after germination, remove some leaves and branches and transplant the plant. Leave only two strong plants in every hill. After 3-4 weeks when the plants are sturdy, loosen the soil (culture). Culture again when the plant is 30 cm high. Always remove the weeds because this will diminish the capacity for fruit bearing.
Apply fertilizer - Sesame does not like humid and rainy place. In rainy season, it is vulnerable to disease, so choose only varieties that are resistant.
Do not plant sesame repeatedly in the same area after harvest, so as to avoid disease or pest. Do not use insecticide containing sulfur because this is not good for sesame.
Harvest
- The sesame plant flourishes from 85-150 days. Harvest when flowering stops, and the leaves turn yellow and fall off.
- The pods burst out when these are ripe, so the seeds will scatter. Cut off the pods when still green and bunch them.
- Spread the branches on a mat and thick cloth and put these under the sun.
- When dried, beat the branches to bring out the seeds. Clean off the stones and dirt, and branches.
- Dry the seeds before storing. If they are for planting, apply chemical on the seeds to keep pests away.
- Plant and planting materials suppliers, or contact DOST
source: elgu2.ncc.gov.ph, pictures from www.seedfest.co.uk, www.goodnessdirect.co.uk
Related Links:
Agri Business
No comments:
Post a Comment